Thursday 4 February 2021

Setting ASP .Net Core Environment in IIS for each App Pool without resorting to web.config changes

For when you don't want to set the environment variable in the web.config file, because that gets deployed.


Go into configuration editor


In the section choose system.webServer/aspNetCore
and then in the From drop down choose the ApplicationHost.config option


There you can add environmentVariables which need to be

ASPNETCORE_ENVIRONMENT
and
Development or Production


Sunday 17 May 2020

Using a Raspberry Pi as an Access Point

Most of the simple solutions I found for using a Raspberry Pi to act as an Access Point used NAT and hosted a DHCP server for the WiFi clients.
But.. What if you want to bridge the ethernet and wifi interfaces and let your existing router handle DHCP and routing?

Well here's my solution taken from a few sources.

Update stuff.
sudo apt-get update && sudo apt-get upgrade -y && sudo apt-get dist-upgrade && sudo reboot now

Set the wifi locale
sudo raspi-config

Install hostapd for the access point
sudo apt-get install hostapd bridge-utils
sudo systemctl stop hostapd

Create a config file for the access point
#sudo nano /etc/hostapd/hostapd.conf
interface=wlan0
bridge=br0
driver=nl80211
ssid=ras
hw_mode=g
channel=1
wmm_enabled=0
macaddr_acl=0
auth_algs=1
ignore_broadcast_ssid=0
wpa=2
wpa_passphrase=changeme
wpa_key_mgmt=WPA-PSK
wpa_pairwise=TKIP
rsn_pairwise=CCMP

Have a test
sudo /usr/sbin/hostapd /etc/hostapd/hostapd.conf

Tell hostapd which config file to user
#sudo nano /etc/default/hostapd
DAEMON_CONF="/etc/hostapd/hostapd.conf"

Enable the service
sudo systemctl unmask hostapd
sudo systemctl enable hostapd
sudo systemctl start hostapd

Stop dhcp from allocating eth0 and wlan0 IP addresses
#sudo nano /etc/dhcpcd.conf
denyinterfaces eth0 wlan0

Add the bridge between the interfaces and let it have a dhcp address
#sudo nano /etc/network/interfaces
auto br0
iface br0 inet dhcp
bridge_ports eth0 wlan0

Add a bridge
sudo brctl addbr br0

Reboot -
sudo reboot

You should have br0 on dhcp now

Extras

Add these lines to the /boot/config.txt to disable the onboard hardware
dtoverlay=disable-wifi
dtoverlay=disable-bt


Refs
https://github.com/billz/raspap-webgui/blob/master/includes/hostapd.php
https://www.raspberrypi.org/forums/viewtopic.php?t=193770 http://www.d3noob.org/2018/12/raspberry-pi-setup-as-bridged-wifi.html?m=1 https://davidtavarez.github.io/2018/re4son_kernel_raspberry_pi/
https://elinux.org/RPI-Wireless-Hotspot
https://github.com/raspberrypi/linux/issues/2619
https://github.com/igorpecovnik/hostapd/issues/1
https://github.com/gnab/rtl8812au/issues/6
https://github.com/aircrack-ng/rtl8812au/issues/408

5G config

ssid=raspi
wpa_passphrase=changeme

bridge=br0
country_code=US

interface=wlan0
driver=nl80211

wpa=2
wpa_key_mgmt=WPA-PSK
rsn_pairwise=CCMP

macaddr_acl=0

logger_syslog=0
logger_syslog_level=4
logger_stdout=-1
logger_stdout_level=0

hw_mode=a
wmm_enabled=1

# N
ieee80211n=1
require_ht=1
ht_capab=[MAX-AMSDU-3839][HT40+][SHORT-GI-20][SHORT-GI-40][DSSS_CCK-40]

# AC
ieee80211ac=1
require_vht=1
ieee80211d=0
ieee80211h=0
vht_capab=[MAX-AMSDU-3839][SHORT-GI-80]
vht_oper_chwidth=1
channel=36
vht_oper_centr_freq_seg0_idx=42


Thursday 13 February 2020

CNCjs on a Raspberry Pi 3A+

Having read and tried to follow the official CNCjs help file on installing, this was the short version that worked for me.


Headless boot

1, Add a linux format file to the boot partition of the ssd ( using lf not crlf) containing

ctrl_interface=DIR=/var/run/wpa_supplicant GROUP=netdev
update_config=1
country=GB

network={
    ssid="«your_SSID»"
    psk="«your_PSK»"
    key_mgmt=WPA-PSK
}

2, Add an empty 'ssh' file to the boot partition to enable ssh

Install the SD card and power on. (wait quite a while the first time)

Installing node and CNCjs

1, Do a
sudo raspi-config 
and disable console on serial but enable hardware serial

2, Run the following

curl -o- https://raw.githubusercontent.com/nvm-sh/nvm/v0.35.2/install.sh | bash
nvm install 10
nvm use 10
npm install -g cncjs

Also
https://learn.watterott.com/hats/rpi-uno-hat/arduino/
https://cnc.js.org/docs/rpi-setup-guide/
https://learn.adafruit.com/program-an-avr-or-arduino-using-raspberry-pi-gpio-pins/programming

Gotchas
PM2 didn't work, used crontab
didn't need sudo for npm commands

To flash GRBL
Follow the install instructions on watterott.com to get avrdude installed then
wget <latest grbl hex file>
sudo avrdude -p atmega328p -P /dev/ttyS0 -c arduino -v -U flash:w:<latest grbl hex file>:i


Extras
Set GPIO on while the PI is running
Edit /boot/config.txt
Add 
dtoverlay=gpio-poweroff,gpiopin=26,active_low

After 4 secs or so the IO pulls low and when the PI is shudown, goes off

Thursday 20 June 2019

Disabling Bluetooth Power Saving


Choose Intel Bluetooth Wireless and enter the Power Options

disable it here

Tuesday 28 February 2017

Web API Testing

This is a little gem for helping to test APIs
http://httpbin.org/

Monday 13 February 2017

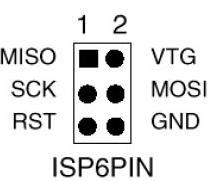
4 in 1 Taranis module - Programming with an Arduino UNO


  1. Program the UNO with the Arduino ISP code in Examples
  2. Load the Miltiprotocol sketch from here: https://github.com/pascallanger/DIY-Multiprotocol-TX-Module
  3. Connect up the UNO to the 4in1 board
    Pin10  -> RST
    Pin11  -> MOSI
    Pin12  -> MISO
    Pin13  -> SCK
    Ground -> GND
    3.3V   -> VCC
  1. Set Board "Arduino Pro or Pro Mini"
    Set Processor "AtMega328 5V, 16Mhz"
  2. Choose the protocols to support so they fit in the available memory by opening _Config.h and commenting out what you don't need from Protocols To Include. Don't comment out a whole module above.
  3. Burn and Prosper

Tuesday 13 December 2016

Free SSL for all - well Azure in this case

These days secure websites are essential where private data is being passed and I came across letsencrypt.org who are issuing free certificates.

I've had fun and games before getting certificates into Azure. Using certreq and/or certmgr.msc on a windows PC being fussy about where and how the CSR was generated, after you have already obtained a .crt, trying to generate the pfx Azure wants.

Here's a relatively painless way of getting things playing nicely together,

  • zerossl.com has a simple interface for generating what's needed.
    Go to https://zerossl.com/free-ssl/#crt and fill in your email and domain and click next a few times to allow it to generate a csr.

  • Download the account-key.txt, domain-csr.txt, domain-key.txt and domain-crt.txt along the way for safe keeping.
  • Download the latest openssl for your OS here https://indy.fulgan.com/SSL/
  • Run
    openssl.exe pkcs12 -export -out myserver.pfx -inkey .\domain-key.txt -in .\domain-crt.txt
  • Upload the myserver.pfx into Azure portal in the certificates section and allocate it to the domain.


To my amazement it works a treat and as long as you put a reminder in your diary, and you renew before the certificate expires in 90 days, you'll have free secure sites.

Update:

Tuesday 22 March 2016

VMWare to Hyper-V

VMware and Hyper-V don't play nice together buy luckily Microsoft provide a conversion utility to migrate VMware drives over to Hyper-V VHDXs

You can get it here, and once it's installed you can use Powershell to do the donkey work.
Don't forget you need admin permissions to run though.

Import-Module 'C:\Program Files\Microsoft Virtual Machine Converter\MvmcCmdlet.psd1'

ConvertTo-MvmcVirtualHardDisk -SourceLiteralPath theVMWareDisk.vmdk -destination newFolder -VhdType DynamicHardDisk -VhdFormat vhdx

Thursday 29 October 2015

JRuby rails : adding a migration

So I can remember for next time

C:\jruby\bin\rails generate migration ProjectUrl url:string

then

jruby -S rake db:migrate

Monday 7 September 2015

Windows 10 and the iMac

As a follow-up to windows 8 running on an old iMac, Windows seamlessly upgraded to 10 and it's all running rather well. All be it a little slowly by modern computer standards.

Windows 10, No IPv4 settings?

You can't get to the IPv4 settings for a VPN now in Windows 10.
No idea why but here's a good write-up on it.

Split Tunneling VPN

Tuesday 1 September 2015

NAZE32, X4R, Cleanflight, smart.port and Taranis telemetry.

Having read the great write-up by Frank on how he got a X4R talking smart port to a NAZE32, I assumed I'd be up and running in no time. There were a couple of snags though.

I didn't want to take a soldering iron to my X4R and I wanted to not reverse the polarity, with a hack, because it would be good to hook up other smart port devices, like the battery voltage monitor, among others

So I built a bi directional inverter with a couple of transistors and 4 resistors.


After getting the serial com polarity fixed, there was another issue with the NAZE running Cleanflight.

The current build expects you to have either hacked the X4R or that you have an F3 board where you can reverse the polarity of the uart via the CLI.
I had neither so I did a build with a non bi-directional serial port.

In the configureSmartPortTelemetryPort function in smartport.c, the port is hard coded as SERIAL_BIDIR. The current code expects that the serial connection is sent over a single wire, but I couldn't figure out the circuit to do that. The NAZE doesn't have serial polarity inversion so, I simply changed the line to SERIAL_UNIDIR, and connected Tx and Rx wires to pins 3 and 4 on the NAZE, respectively.


 void configureSmartPortTelemetryPort(void)  
 {  
   portOptions_t portOptions;  
   if (!portConfig) {  
     return;  
   } 
   portOptions = SERIAL_UNIDIR; 
   if (telemetryConfig->telemetry_inversion) {  
     portOptions |= SERIAL_INVERTED;  
   }  
   smartPortSerialPort = openSerialPort(portConfig->identifier, FUNCTION_TELEMETRY_SMARTPORT, NULL, SMARTPORT_BAUD, SMARTPORT_UART_MODE, portOptions);  
   if (!smartPortSerialPort) {  
     return;  
   }  
   smartPortState = SPSTATE_INITIALIZED;  
   smartPortTelemetryEnabled = true;  
   smartPortLastRequestTime = millis();  
 }  

Et voila, Cleanflight telemetry on my Taranis.


Edit: Pic of connections

Tuesday 17 February 2015

Accessing Chrome's Cache

This is getting to be a bit of a theme on my blog.
Recovering files I've deleted or overwritten. Ooops

I've been working on some css all day and I've gone to merge some other work and guess what.
I overwrote the file with today's work.

Ooops

Windows 8 file history wasn't turned on and I had that sinking feeling in my stomach.
Since I'd been working in Chrome all day, surely it will have the css cached?

Well it turns out it's not like IE, in the good old days when each cached file was in plain sight in a cache folder. I could only find the HTML in C:\Users\%user%\AppData\Local\Google\Chrome\User Data\Default\Cache No sign of css or js.

But chrome has a page with cached files listed.

chrome://cache/

Ctrl-F found no files though.... Odd.

So I tried to find the file by entering the path directly.

chrome://view-http-cache/http://www.somedomain.com/templates/css/template.css

Bingo. Then you get some gobbledygook well the raw data from the web server. Kinda what you'd expect really.


From here you need to use this great website here where you can paste the data into the form and get the original file back.

Well there's 8 hours saved. Thanks Google.


Thursday 8 January 2015

Migrating a virtual hard disk to Hyper-V from VirtualBox

I've been using VirtualBox for a while for my testing environments and thought it would be a good test to see if they can be run on Hyper-V (well the truth is I couldn't be bothered to find the server 2012 install media and wanted a server on a PC without VBox.)

So a quick google reveals that VirtualBox has a utility to migrate the VDI files it uses.

VBoxManage.exe internalcommands converthd -srcformat VDI -dstformat VHD "original.vdi" "new.vhd"

Well blow me over with a feather if it didn't work first time, once I'd added a new machine in Hyper-V and pointed it at the VHD

Monday 24 November 2014

Recuva SSD File recovery

I got caught out by Visual Studio.

Team Explorer told me I had untracked files in my Entity Framework migrations which I assumed were kicking around from when I set-up the project.

Turns out they just hadn't been added to version control for some reason. The worst bit? They were the initial database create files, meaning without them nothing can be re-created from scratch. Eeeek

Anywho... Recuva to the rescue.

Works brilliantly from my little test.

Friday 29 November 2013

PDFs from ASP.Net pages, exactly as they look in a browser, with forms auth.

So, I'm writing a web report that has a number of different charts and grids.
The customer wants to print straight from the browser and then save as a PDF.
You spend quite a bit of time getting the page just right, and then a bit more getting the css for the printing just so.
After all that, the prospect of writing it all again, using a server side PDF library is a bit unpalatable.

What we need is a tool to run on the server that does what a browser does, and serves the rendered page as a PDF to the browser.

Enter phantomjs.

This is a headless implementation of a web-kit browser that you can manipulate using JavaScript.
There are quite a few good tutorials on getting phantomjs to serve up a PDF, but I needed to use it on a ASP.Net MVC site using Forms Auth.

When the webkit browser goes to load the pages, its not authenticated and gets bounced to the mvc login page.

To get phantomjs  logged in I needed to pass it the authentication cookie from the request.
Here's how it works

////////////////////////////////////////////
// pdfAuth.js
////////////////////////////////////////////
var page = require('webpage').create(),
    system = require('system'),
    address, output, size;

address = system.args[1];
output = system.args[2];
domain = system.args[3];
auth = system.args[4];

page.viewportSize = { width: 600, height: 600 };

page.paperSize =  { format: "A4", orientation: 'portrait', margin: '1cm' };

phantom.addCookie({
 'name': '.ASPXAUTH',
 'value': auth,
 'domain': domain
});

page.open(address, function (status) {
 if (status !== 'success') {
  console.log('Unable to load the address!');
  phantom.exit();
 } else {
  window.setTimeout(function () {
   page.render(output);
   phantom.exit();
  }, 200);
 }
});


The Js fIle accepts three parameters:
  1. The URL of the page to render
  2. The output filename
  3. The aspxauth cookie
This dumps a file on disk for the mvc code to pick up.

The following code is a sample action that pokes phantomjs with the right parameters to send the PDF to the client

        public ActionResult Print(string url)
        {

            string serverPath = HttpContext.Server.MapPath("~/Phantomjs/");
            string filename = DateTime.Now.ToString("ddMMyyyy_hhmmss") + ".pdf";

            url = "http://" + Request.Url.Authority + "#" + url;

            new Thread(new ParameterizedThreadStart(x =>
            {
                ExecuteCommand("cd " + serverPath + @" & phantomjs pdfAuth.js " + url + " " + filename + " " + Request.Url.Host + " " + Request.Cookies[".ASPXAUTH"].Value);
            })).Start();

            var filePath = Path.Combine(serverPath, filename);

            var stream = new MemoryStream();
            byte[] bytes = DoWhile(filePath);

            return File(bytes, "application/pdf", filename);
        }

        private void ExecuteCommand(string Command)
        {
            try
            {
                ProcessStartInfo ProcessInfo;
                Process Process;

                ProcessInfo = new ProcessStartInfo("cmd.exe", "/K " + Command);
                ProcessInfo.CreateNoWindow = true;
                ProcessInfo.UseShellExecute = false;

                Process = Process.Start(ProcessInfo);
            }
            catch { }
        }

        private byte[] DoWhile(string filePath)
        {
            byte[] bytes = new byte[0];
            bool fail = true;

            while (fail)
            {
                try
                {
                    using (FileStream file = new FileStream(filePath, FileMode.Open, FileAccess.Read))
                    {
                        bytes = new byte[file.Length];
                        file.Read(bytes, 0, (int)file.Length);
                    }

                    fail = false;
                }
                catch
                {
                    Thread.Sleep(500);
                }
            }

            System.IO.File.Delete(filePath);
            return bytes;
        }

Thursday 31 January 2013

Nexus 4 ordered

Lets see how long it takes to get here.

My old Nexus One has been the best phone I've owned (I've had some shockers)

So I'm hoping the N4 will carry on the great service.
I've got a bit entrenched in the Google ecosystem, but things do tend to "Just work"
Hmm I've heard that somewhere before.

Tuesday 13 November 2012

Windows 8 and the iMac

Our trusty old iMac has been in use for a while now, without having had the luxury of regular updates to the latest operating system. It was running Loepard, 10.5.8 I think, and there were quite a few apps that don't run on this dated OS.
Apple's word processor being the most annoying one.
The upgrade process involved something coming via snail mail as iTunes would only install music (apologies if this isn't correct, but I got fed up trying to work out how to get Lion installed via a download).
So with Microsoft offering cheap Windows 8 licenses, it had to be worth a go didn't it?


It wasn't entirely plain sailing though.

First I discovered that we had a 9,1 iMac, which did support x64 versions of Windows, which was nice.
Second the version of Bootcamp didn't support installing from a USB drive, and I couldn't find any DVDs about the house.

What I did was run Bootcamp 2.0, which still partitioned the HD perfectly for me, and then tried to re-boot and get the Mac to run from a USB image of the Win8 ISO.

The next problem was that the iMac doesn't boot to USB natively and I needed to install rEFIt, from here.
rEFIt worked perfectly and when you plug in the USB drive and reboot a couple of times you get a menu to choose where you want to boot from.

After a half an hour or so, BINGO, Windows 8 was installed.

Then there are a couple of things to tidy up. To boot to Window 8 automatically you need to go into OSX and choose the default boot partition from the system preferences, and you will have a better Windows 8 experience if you download the Bootcamp drivers which Chris Carrol had documented here.
NB You need 7-Zip V4.65 to extract pkg files.

Enjoy.


Wednesday 31 October 2012

Visual Studio, Box select/Column select

Well I never....
For years I've been copying text into and out of Notepad++ so I could use the column editing mode.

It turns out VS has had it since VS2010


Simply hold down Alt-Shift instead of Shift while you are selecting the text and you get a box select.
Then you can type across as many rows as you have selected.
Neat